We got the top tips for the perfect arch, straight from the experts themselves.
With the recent turn of events, we’ve all become our own hairstylists, aestheticians, and nail artists in our living rooms. From trimming our own bangs to removing gel nails, if there’s one thing I can say coming out of this quarantine, it’s that I have an elevated respect for beauty professionals. One of the hardest things to do by yourself in these stressful DIY times, no matter how much of a beauty virtuoso you are, is maintaining your brow shape. In order to help you get the shapeliest, most face-flattering results, we consulted some of our favorite makeup artists (virtually, of course) to teach you how to pluck, shape, and define your brows to perfection.
1. Let your brows grow (and hide the tweezers!)
To everyone who’s found themselves plucking with wild abandon only to hate themselves after, this one’s for you. We all know how easy it is to get tweezer-happy, so now is the perfect time to grow out those brows (it’s not like anyone is going to see them). All the experts agree that a good arch starts with enough brow hair to work with, so try a brow serum, like Grande Cosmetics GrandeBROW Brow Enhancing Serum ($70; sephora.com). Your product should be packed with antioxidants, vitamins, and amino acids to help strengthen and condition brow hairs. You can also try massaging a little coconut or castor oil on your brows before bed to give your regrowth rate a natural push.
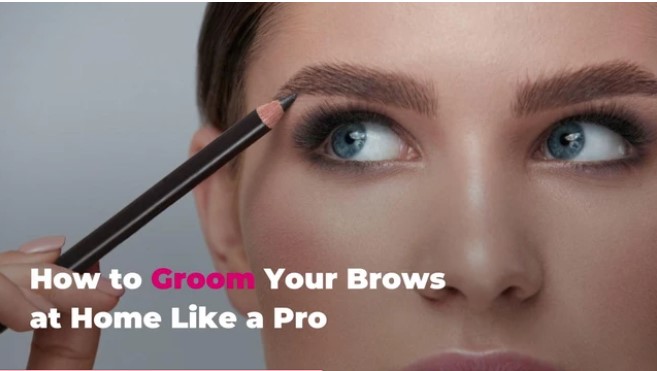
2. Determine your brow shape
I know, I know; this is easier said than done. But determining the best brow shape for your face is actually pretty painless and only requires a pencil. According to the experts at Cosmetify, “To determine the length, hold a pencil up to your left/right nostril and point it straight up towards your forehead. This indicates where your brow should start. Turn the pencil diagonally, still holding it in line with your nostril to figure out where your brow should end, ensuring it is past your eye’s outer corner.” Once you’ve got that down, the brow shape will require a little extra effort. The experts recommend taking the pencil you were using before and holding it next to your nostril at a 45 degree angle. This indicates where your natural arch should begin. Your pencil should go just past your pupil, pointing exactly to where the brow arch should be.
3. Tame your targeted area
OK, you’ve grown out your foundation and drawn your outline. But wait! Before you pluck those bad boys, take a few minutes to prime, which will prevent you from making further mistakes down the line. A couple pointers: Laura Geller, makeup artist and founder of Laura Geller Beauty, stresses staying away from magnified mirrors (aka the gateway drug to overplucking) in order to avoid unnecessary tweezing. Also, make sure to tweeze after a steamy shower, says Audrianna Mora, licensed aesthetician and global education manager at RevitaLash Cosmetics. The warm water softens hairs, making the process a little less painful.
4. Pluck (sparingly!)
When you’re ready, start by brushing your brows up and across to see the shape. Then, pluck any pesky stray hairs one or two at a time. “When plucking your eyebrows, it’s important you don’t get heavy-handed,” says Cosmetify. “Stick to rogue hairs in the middle of your brows, under the brow bone, and around the eyelid.” For the ultimate clean cut, try drawing your preferred shape and use it as a guideline on where to pluck the hairs. “Remember that eyebrows are sisters, not twins,” adds Mora. “Achieving perfect symmetry most likely won’t happen, and will likely lead to over-plucking.”
5. Fill in the gaps
It’s time to fill in those sparse areas. “First, use a fine brow pencil, like Maybelline New York Brow Ultra Slim Defining Pencil ($8; walgreens.com), to create small, sparse, and hair-like strokes,” says Grace Lee, celebrity makeup artist. For larger gaps, we recommend a product with a forked tip, like Laura Geller Heavenly Brows 24 Hour Brow Marker ($24; laurageller.com), to mimic a more realistic, micro-bladed look. “Then, build out to the desired fullness you wish to achieve. If you feel like you have gone too far, you can always brush and blend with a spoolie.”
6. Add a brow gel
We’re almost there! For the finishing touch, add a hint of brow gel to hold your masterpiece in place. “The trick to fuller-looking brows is brushing them up,” says Mora. “Use a brow gel, like RevitaLash Hi-Def Brow Gel ($32; nordstrom.com), to brush brows up and add long-lasting definition.”